

Spoiler: this was not easy !

From Sitecore version 9, it has been possible to install Sitecore XP and XC on Docker. The installation was not straightforward and needed a lot of patience and a really good comprehension of how Docker works and how Sitecore parts interact with one another. When Sitecore 10 was released in August, there were a lot of scripts and documentation in order to make the installation of XP and XC on Docker easier. And indeed, the installation of Sitecore XP was really easy and once you have installed locally Docker and .Net 3.1, consisted of
- downloading and unzipping the correct package from Sitecore Downloads
- edit the environment file .env and place the correct values according to the installation guide
- run the command “docker-compose up -d”
I expected the installation of Sitecore XC 10 to be as easy as Sitecore XP 10, but I was so wrong. It took me days to figure out what has to be fixed in order to have the Storefront webshop running on my environment. In this article, I will explain the installation process, and especially the errors and challenges I faced.
Download Sitecore Commerce Containers SDK
Log in to dev.sitecore.net and download the Sitecore Commerce Containers SDK.
Unzip it to an empty folder.
You’ll see the following folders

| Folder name | Description |
|---|---|
| k8s-commerce-xc1 | Contains files required for a Kubernetes XC1 deployment topology. |
| scripts | Contains a set of supporting scripts and JSON files, provided as examples, that facilitate the creation of the Sitecore Experience Commerce container images using the Docker. Also contains a README file describing the purpose of each script. |
| xc0 | Contains files used to build and run a Sitecore XC instance in a XC0 topology, for deploying the Commerce Engine only. The XC0 topology for developer workstation does not include container images for the SXA storefront or supporting modules. For a deployment that includes the modules required to support the SXA storefront, you must install the XC1-CXA topology. |
| xc1 | Contains files used to build Sitecore XC1 topology images. The XC1 topology is for a scaled deployment that excludes modules supporting the SXA Storefront. You use this topology in a scaled, Commerce Engine only deployment, that does not use the SXA Storefront. The Sitecore Commerce Container SDK does not include all Docker compose YAML files required to deploy the container images of the XC1 topology. |
| xc1-cxa | Contains files necessary to build and run a Sitecore XC instance in a XC1 topology. This deployment topology includes the SXA Storefront. |
| xc-common | Contains files necessary to build common Sitecore XC images. Common images are used by all Sitecore XC topologies. |
As I want to install the SXA Storefront, I need to install the XC1-CXA topology.
Setting up the parameters
Using the Installation Guide for Developper Workstation With Containers, you can fill the empty variables in the file .env and generate the TLS/HTTPS certificates.
Don’t forget to create a sandbox environment in Braintree and report your MerchantId, Public and Private key in .env
The SITECORE_LICENSE is the Base64 value of the compressed XML license. You can just run the following command the value will be set correctly:
Set-DockerComposeEnvFileVariable "SITECORE_LICENSE" -Value (ConvertTo-CompressedBase64String -Path "%%PATH_To_license.xml%%")
Update the Windows host file with the correct host names:
127.0.0.1 xc1cm.localhost
127.0.0.1 xc1cd.localhost
127.0.0.1 bizfx.localhost
127.0.0.1 authoring.localhost
127.0.0.1 shops.localhost
127.0.0.1 minions.localhost
127.0.0.1 ops.localhost
That should be all, right ? Let’s rock !
According to the installation guide, all we need to do now is a
docker-compose up --detach
and our XC1 should start just fine… Well, as you may guess now, it was not the case. I got the following error message:

ERROR: for xc1-cxa_bizfx_1 Cannot start service bizfx: container xxx encountered an error during hcsshim::System::CreateProcess: failure in a Windows system call: The password for this account has expired. (0x532)
yadayadayada
extra info: {yadayadayada, "User":"commerce_admin", yadayadayada}
bizfx is a docker image we get from the official sitecore source (scr.sitecore.com/sxc/sitecore-xc-bizfx:10.0.0-ltsc2019), so if this image has a problem with an account’s password, then the only way to correct this is to build our own bizfx image and make sure the account’s passwords don’t expire.
Fortunately, Sitecore Commerce Containers SDK comes with some very handy scripts, some of them just to create our own docker images:
| File | Description |
|---|---|
| ContainerBuild.ps1 | Script used to build container images based on the contents of the docker-compose.build.yml files. The results are container images with the tag “latest”. |
| PrepContainerBuild.ps1 | Script that takes the Sitecore Experience Commerce Release Package artifacts and expands them into the source code directory structure. |
| WDPMapping.json | File used by the PrepContainerBuild.ps1 script. This file contains mapping information that is used to place the content of the release package artifacts in the correct location to be use when running the docker-compose build command. |
In the xc-common folder, you’ll have the common images Dockerfiles. The two files we have to change are:
xc-common/bizfx/Dockerfile
After the SHELL command row 15, add:
RUN Set-LocalUser -Name "commerce_admin" -PasswordNeverExpires $true
xc-common/engine/Dockerfile
This file gets the LogMonitor.exe from an old source, that is not available anymore. So replace the line at row 12 by the following one:
ADD https://github.com/microsoft/windows-container-tools/releases/download/v1.1/LogMonitor.exe .\LogMonitor\LogMonitor.exe
In order to run the ContainerBuild.ps1, you’ll need to download all the necessary WDP files from dev.sitecore.net. Download Packages for On Premise WDP 2020.08-6.0.238 and unzip this file to (for ex c:\src\downloads)
Copy the scripts ContainerBuild.ps1, PrepContainerBuild.ps1 and WDPMapping.json one folder up, so they are at the same level as the folders xc1-cxa and xc-common. You can actually remove the folders xc0, xc1 and k8s-commerce-xc1 (otherwise you’ll build unnecessary images).
Run the following command in Powershell as an administrator:
.\PrepContainerBuild.ps1 -releaseZipPath 'C:\src\downloads'
This script will create the necessary wdp/dacpac folders inside the build folders for every images. Make sure you have the following structure now

You can now build the docker images. As I just wanted to build bizfx images, I copied the script file ContainerBuild.ps1 in the xc-common folder, change directory to this folder and execute
.\ContainerBuild.ps1 -envRootPath (Join-Path $PWD ".")
A “docker images” shows me the newly build images

In order to use the newly sitecore-xc-bizfx image, and not the official one from Sitecore, I need to tell Docker to take sitecore-xc-bizfx:latest instead of ${XC_SITECORE_DOCKER_REGISTRY}sitecore-xc-bizfx:${XC_PACKAGES_TAG}
To do that, just create a file docker-compose.override.yml in the xc1-cxa folder. This file will have the following code
version: "2.4"
services:
  bizfx:
    image: sitecore-xc-bizfx:latest
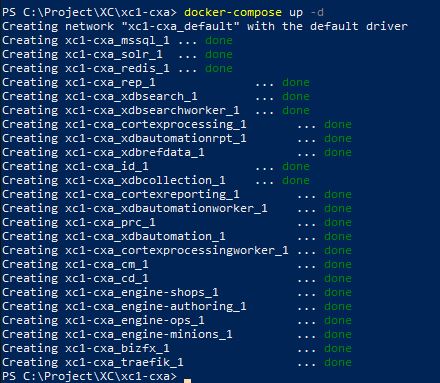
NOW we can open a Powershell console as an administrator, change directory to the xc1-cxa folder and execute
docker-compose up -d
The resultat is now correct
Do the Post-deployment tasks (chapter 4 of the Installation guide for a Commerce Developer Workstation with Container) and you’re up !
